Mid century modern design emerged in the post-war period (1945–1969) and has never truly left the spotlight. Its clean lines, functional beauty, and honest use of materials continue to resonate with homeowners who want a kitchen that feels both retro and refreshingly current. Unlike trendy styles that age poorly, mid century modern kitchens offer timeless appeal rooted in good design principles.
Achieving this look isn’t about buying vintage pieces at markup prices or gutting your entire space. It’s about understanding the core elements, flat-panel cabinetry, warm wood tones, integrated appliances, and strategic pops of color, then applying them thoughtfully to your existing layout. Whether you’re planning a full remodel or a weekend refresh, this guide breaks down the essential components, material choices, and DIY-friendly tactics to bring mid century modern style into your kitchen.
Key Takeaways
- Mid century modern kitchen design prioritizes clean lines, flat-panel cabinetry, and functional beauty that remains timeless rather than trendy.
- Essential elements include warm wood tones, integrated appliances, geometric shapes, and strategic color blocking—all achievable without a complete remodel.
- Material honesty is key: embrace natural wood grain, quality laminate, tile, and stainless steel rather than materials that imitate something else.
- Budget-friendly updates like repainting cabinets, upgrading hardware, and installing a geometric backsplash can deliver authentic mid century modern style for $100–$400 per project.
- Sculptural lighting fixtures in brass, wood, or matte finishes double as functional art and are signature elements that elevate the entire kitchen.
- Two-tone cabinetry, open shelving, and vintage accessories from thrift stores or salvage yards add period-accurate character while keeping costs manageable.
What Defines Mid Century Modern Kitchen Design?
Mid century modern kitchens prioritize function over ornamentation. The style strips away unnecessary details, leaving clean horizontal lines, geometric shapes, and a strong connection between indoor and outdoor spaces. You won’t find ornate crown molding, raised panel doors, or fussy hardware here.
Key characteristics include:
- Flat-panel or slab-front cabinetry with minimal hardware (often just slim pulls or none at all)
- Open shelving or glass-front upper cabinets to reduce visual weight
- Integrated appliances that blend into cabinetry rather than standing out
- Natural materials like walnut, teak, or oak paired with stainless steel, tile, and stone
- Organic and geometric shapes in backsplashes, light fixtures, and stools
- Color blocking with bold accent walls or two-tone cabinetry
The era celebrated new materials and manufacturing techniques, think laminate countertops, vinyl flooring, and stainless steel, but always balanced them with warm wood tones to avoid cold, sterile spaces. Designers like Charles and Ray Eames, George Nelson, and Eero Saarinen influenced not just furniture but entire room layouts, emphasizing flow, light, and multipurpose spaces.
In a mid century kitchen, every element serves a purpose. Storage is built-in but unobtrusive. Counters are clear and work zones are logical. The result feels edited, not cluttered, a quality that makes the style especially practical for modern living.
Essential Elements for Your Mid Century Modern Kitchen
Cabinetry and Storage Solutions
Cabinets define the visual tone of any kitchen, and mid century designs favor simplicity. Flat-panel doors (also called slab doors) with horizontal grain patterns in walnut, teak, or oak veneer are signature choices. If you’re working with existing cabinets, refacing or replacing doors is more cost-effective than a full tear-out.
Hardware should be understated. Horizontal bar pulls in brushed nickel, brass, or matte black work well. Alternatively, go hardware-free with touch-latch mechanisms, a nod to the era’s love of sleek, uninterrupted surfaces.
Upper cabinets can be swapped for open shelving or reduced in number to create an airy feel. If you need enclosed storage, consider glass-front uppers with interior lighting to showcase dishware. Lower cabinets often feature deep drawers instead of traditional shelves, improving access and organization.
Pantry storage in mid century kitchens was frequently integrated into floor-to-ceiling cabinets with sliding or pocket doors. This keeps bulk items hidden while maintaining clean sightlines. If you’re retrofitting, a slim pantry cabinet (12–18 inches deep) can tuck into an unused corner or beside the fridge.
Avoid distressed finishes, ornate trim, or anything resembling country or traditional styling. The goal is visual calm and horizontal emphasis.
Color Palettes That Capture the Era
Mid century modern kitchens aren’t afraid of color, but they use it strategically. The base palette typically includes warm woods, white, and neutral grays, with accent colors drawn from nature and the Atomic Age.
Popular accent hues:
- Burnt orange, mustard yellow, and avocado green (used sparingly on walls, stools, or small appliances)
- Teal, turquoise, and coral for a brighter, West Coast vibe
- Charcoal, navy, or black for dramatic contrast
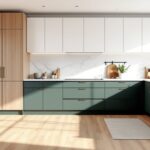
Two-tone cabinetry is a period-accurate move: walnut lowers with white uppers, or a bold color on the island paired with wood perimeter cabinets. Paint lower cabinets in a rich, saturated tone and keep uppers light to avoid a top-heavy look.
Backsplashes offer another opportunity for color. Subway tile in classic white works, but consider geometric patterns in hex, penny round, or arabesque shapes. Encaustic cement tiles with retro motifs add instant character without overwhelming the space.
When choosing paint, opt for low-VOC or zero-VOC formulas in satin or eggshell finishes. Benjamin Moore and Sherwin-Williams both offer curated mid century palettes that simplify selection.
Choosing the Right Materials and Finishes
Material honesty is a cornerstone of mid century design, show wood grain, don’t hide it: use tile and metal in their natural states. This doesn’t mean everything needs to be expensive, but it does mean avoiding materials that try to look like something they’re not.
Countertops: Laminate was the workhorse of the 1950s and ’60s, and modern laminates (like Formica or Wilsonart) now come in sophisticated patterns that mimic terrazzo, marble, or solid colors. For a higher-end look, quartz in white or light gray with subtle veining fits the aesthetic. Butcher block in walnut or maple adds warmth and pairs beautifully with stainless steel appliances.
Flooring: Original mid century homes often featured cork, linoleum, or vinyl in bold patterns. Today’s luxury vinyl plank (LVP) in wood-look finishes offers durability and easy installation over existing floors. If you’re going with tile, large-format porcelain in matte finishes or classic terrazzo patterns work well for modern kitchens that value both form and function.
Backsplashes: Stick to materials with clean lines. White or colored subway tile (3×6-inch) laid in a straight or offset pattern is a safe bet. For more personality, try hexagonal mosaics, glass tile in a single bold color, or slab stone that runs from counter to upper cabinets for a seamless look.
Hardware and fixtures: Brushed brass, aged brass, and matte black finishes align with mid century aesthetics better than polished chrome. Faucets should have simple, sculptural lines, gooseneck or bridge styles with single-lever operation.
When sourcing materials, check local architectural salvage yards for period-appropriate hardware, light fixtures, or cabinet pulls. Reproduction pieces are widely available, but vintage finds add authenticity (and often cost less).
Lighting Fixtures That Make a Statement
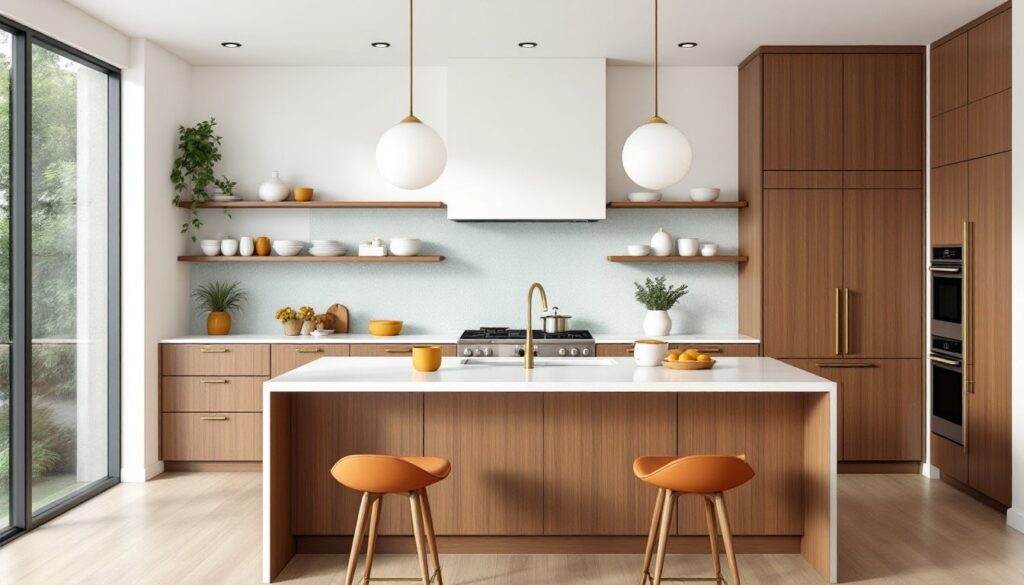
Lighting in a mid century kitchen is sculptural and intentional. Fixtures double as art, featuring globe shapes, Sputnik designs, or clean geometric forms in brass, wood, or matte finishes.
Pendant lights are a natural fit over islands or peninsulas. Look for globe pendants in opal glass, cone-shaped metal shades, or multi-arm fixtures with exposed bulbs. Hang them 30–36 inches above the counter surface, centered over the workspace. For an 8-foot island, two large pendants or three smaller ones provide balanced task lighting.
Under-cabinet lighting wasn’t common in the original era, but it’s a practical upgrade. LED strip lights or puck lights in warm white (2700–3000K) improve task visibility without altering the design language. Recess them along the front edge of upper cabinets to minimize glare.
Flush-mount or semi-flush ceiling fixtures work in kitchens with standard 8-foot ceilings. Seek out designs with brass or wood accents, drum shades, or starburst motifs. Avoid recessed can lights as the sole light source, they’re efficient but lack the character that defines the style.
For a curated selection of period-appropriate fixtures, Design Milk regularly features modern lighting that aligns with mid century principles. Alternatively, platforms like Etsy and eBay offer vintage originals that can be rewired to current electrical code (hire a licensed electrician for safety).
Safety note: Always turn off power at the breaker before installing or replacing light fixtures. Use a non-contact voltage tester to confirm wires are dead. If your home has aluminum wiring (common in the 1960s–70s), consult an electrician before making changes.
Budget-Friendly DIY Tips for Achieving the Look
A full mid century kitchen remodel can run $15,000–$50,000+ depending on your region and material choices, but there are plenty of high-impact, low-cost moves you can tackle yourself.
1. Reface or repaint existing cabinets.
If your cabinet boxes are solid, replace doors and drawer fronts with flat-panel styles. Home centers sell unfinished slab doors in standard sizes: stain them in walnut or paint in a period color. Budget around $100–$300 per door for materials. Alternatively, remove upper cabinet doors entirely and add a fresh coat of paint to the interior for an open-shelving effect.
2. Swap out hardware.
Replacing knobs and pulls is the fastest visual refresh. Choose horizontal bar pulls (4–6 inches long) in brushed brass or matte black. Expect to spend $3–$10 per pull. Drill new holes if needed, then fill old ones with wood filler, sand smooth, and touch up with paint.
3. Add a geometric backsplash.
Peel-and-stick tile has improved dramatically. Products like Smart Tiles or Tic Tac Tiles come in hexagon, subway, and retro patterns that install without mortar or grout. They’re not as durable as real tile but work well for renters or quick updates. Real tile installation is DIY-friendly if you rent a wet saw and follow layout guidelines. For a standard 20-square-foot backsplash, budget $100–$400 in materials.
4. Install open shelving.
Remove one or two upper cabinets and replace them with floating shelves in walnut or white oak. Use heavy-duty brackets rated for the load (dishes are heavier than you think). Shelves should be 10–12 inches deep and spaced 12–18 inches apart. Expect to spend $50–$150 per shelf depending on length and material.
5. Upgrade lighting.
Swap a dated ceiling fixture for a Sputnik or globe pendant. Most screw into existing junction boxes, making this a one-hour project. If you’re adding pendants over an island and there’s no existing box, you’ll need to run new wiring, consider hiring an electrician or using a plug-in swag kit as a workaround.
6. Refresh walls and trim.
A fresh coat of paint in a curated mid century color transforms the space. Use a high-quality primer (especially over dark or glossy surfaces) and two coats of satin or eggshell finish paint. Prep is everything: clean walls, fill holes, sand, and tape trim lines carefully. Budget a weekend and around $100–$200 for a typical kitchen.
7. Source vintage accessories and stools.
Thrift stores, estate sales, and online marketplaces often have period barstools, clocks, and ceramics at a fraction of retail. Selecting the right counter stools anchors the aesthetic and provides functional seating. Look for tapered wood legs, molded plywood seats, or vinyl upholstery in bright colors.
Safety and permits: Cosmetic updates like painting, hardware swaps, and backsplash installation typically don’t require permits. If you’re moving plumbing, gas lines, or adding new electrical circuits, check local building codes and pull permits as needed. Structural changes, removing walls, altering load-bearing elements, require professional assessment and usually a licensed contractor.
For broader inspiration on integrating mid century elements with other interior design trends, explore resources that track evolving aesthetics while respecting classic principles.