The TV wall is no longer just a place to mount a screen, it’s become a focal point that defines the entire room. Homeowners are moving beyond basic black rectangles on white walls and creating feature zones that blend function, storage, and design. Whether you’re working with a compact apartment wall or a full living room expanse, the right approach can turn your TV setup from an eyesore into an intentional design statement. This guide covers practical, buildable options that range from simple weekend projects to more involved installations, all achievable with standard tools and materials.
Key Takeaways
- Modern TV wall design ideas transform your setup from basic to intentional by combining function, storage, and aesthetics through floating mounts, textured accents, or built-in entertainment centers.
- Minimalist floating TV walls require proper wall mounting to studs with in-wall cable concealment kits, reducing visual clutter while making rooms feel larger and more spacious.
- Textured accent walls using 3D panels, board-and-batten, or faux stone add visual depth and dimension, with costs ranging from $100–$200 for materials on an 8×10-foot wall.
- Built-in storage and entertainment centers deliver high-end results by combining shelving, cabinets, and display space while anchoring tall units to studs for safety.
- LED backlighting is a plug-and-play upgrade taking 30 minutes that reduces eye strain using 6500K daylight white, and can integrate with smart home systems for zone-based control.
- Wood paneling and natural materials bring warmth to tech-heavy TV walls, whether using reclaimed lumber or trending slatted designs with intentional gaps, and must acclimate 48–72 hours before installation.
Minimalist Floating TV Wall Designs
A floating TV wall removes all visible clutter, no console, no cables, no distractions. The screen appears to hover against the wall with components hidden behind or inside.
What you’ll need: A full-motion or low-profile wall mount rated for your TV’s weight (check VESA pattern), in-wall cable concealment kit (typically includes two gang boxes and a brush-plate pass-through), and drywall anchors or stud mounting hardware if you’re attaching directly to framing.
Installation steps:
- Locate studs using a stud finder and mark center points at the desired mount height (eye level when seated is typically 42–48 inches to the center of the screen).
- Cut an access hole behind the TV location and another near the floor or behind your media console to run HDMI, power, and other cables. Use an in-wall power kit rated for NEC compliance, never run standard extension cords inside walls.
- Mount the bracket securely to at least two studs using lag bolts, not just drywall anchors. A 65-inch TV can weigh 50+ pounds: cheap toggles won’t cut it.
- Install brush-plate wall ports top and bottom to keep the opening clean and code-compliant.
- Hang the TV and route all cables through the wall cavity.
Floating media consoles can sit below the TV without touching the floor, mounted to studs with heavy-duty brackets or a French cleat system. This maintains the airy look while giving you a surface for a soundbar or decorative objects. If you’re mounting a console, confirm your wall can handle the load, ¾-inch plywood backer between studs is a smart reinforcement for heavy shelving.
This approach works best on open walls without windows or built-ins. It’s clean, modern, and makes the room feel larger.
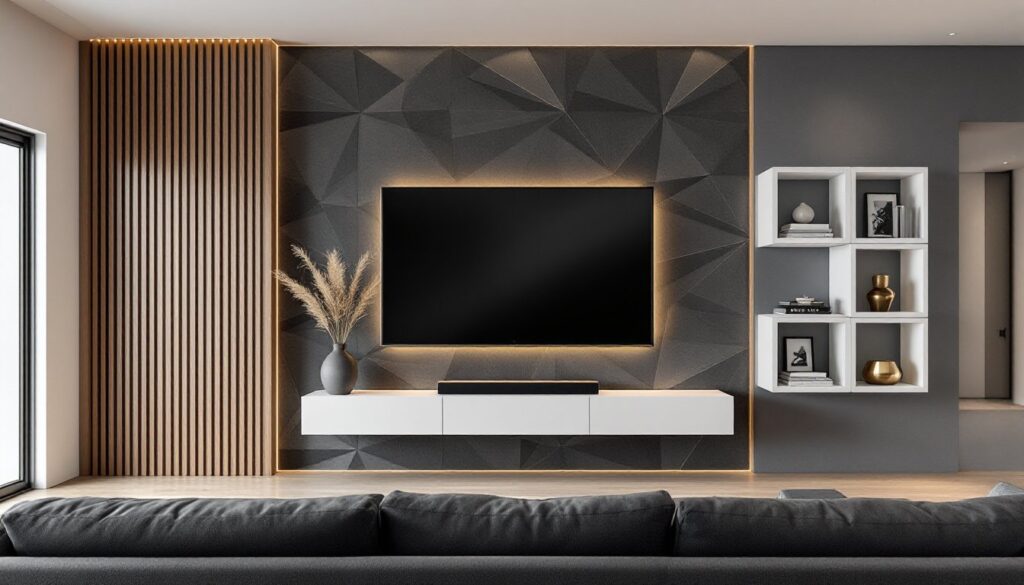
Textured Accent Walls Behind Your TV
Texture breaks up flat drywall and gives the TV visual weight without adding bulk. Popular materials include 3D wall panels, board-and-batten, ship lap, and faux stone veneer.
3D wall panels (often made from MDF, PVC, or plant fiber) install with construction adhesive and finish nails. They come in geometric patterns, waves, and grooves. Cut them with a fine-tooth saw or utility knife, apply Liquid Nails or similar to the back, press into place, and pin with a brad nailer. Paint them the same color as the wall for subtle depth, or use a contrasting shade to emphasize the pattern.
Board-and-batten creates vertical lines using 1×2, 1×3, or 1×4 boards spaced evenly over a painted background. This is a weekend project that requires a miter saw, level, stud finder, and nail gun. Measure your wall, divide it into equal sections (typically 8–12 inches apart), and attach battens directly to studs where possible. Fill nail holes, caulk seams, and paint for a cohesive finish. It’s affordable, expect to spend $100–$200 for an 8×10-foot wall depending on lumber prices.
Faux stone or brick veneer adds serious texture. Lightweight panels or individual stones install over drywall with thinset mortar or panel adhesive. You’ll need a wet saw for cuts and grout (or leave it dry-stacked for a modern look). This option adds ½ to 1 inch of depth, so plan your TV mount accordingly.
Texture works especially well when paired with lighting design techniques that cast shadows and enhance the three-dimensional effect. Wear safety glasses when cutting panels or tile, and a dust mask if you’re sanding MDF.
Built-In Storage and Entertainment Centers
A custom built-in turns the TV wall into a functional room divider with shelving, cabinets, and display space. This is a step up in complexity but delivers high-end results.
Framing the structure: Build a 2×2 or 2×4 frame anchored to studs, floor, and ceiling. Use a level and plumb bob to ensure everything’s square, wonky framing means doors won’t close. Attach the frame with 3-inch construction screws into studs and plates.
Casing and shelving: Sheath the frame with ½ or ¾-inch plywood for a sturdy backing, then add ¾-inch hardwood plywood or MDF shelves cut to size. Adjustable shelving uses metal standards and clips: fixed shelves use dados or cleats. If you’re storing books or equipment, assume 20–30 pounds per linear foot and add center supports for spans over 36 inches.
Doors and drawers: Pre-made cabinet doors (available from big-box stores or online suppliers like Barker Door) save time. Attach with European hinges for a clean, concealed look. Drawers require slides, soft-close full-extension slides are worth the extra $10 per pair.
Finish work: Fill screw holes and seams with wood filler, sand smooth (120-grit, then 220-grit), prime with a stain-blocking primer (especially over MDF, which soaks up paint), and finish with semi-gloss or satin paint for easy cleaning.
Safety note: Anchor tall built-ins to wall studs with furniture straps or L-brackets to prevent tip-over, especially in homes with kids. Many current interior design trends favor open shelving mixed with closed storage for a balanced, uncluttered look.
This project typically takes a long weekend and requires a miter saw, drill, level, and either a table saw or track saw for sheet goods. If you’ve never built cabinetry, start with a simpler alcove shelf unit before tackling a full wall.
LED Lighting and Backlighting Effects
LED strip lighting behind the TV reduces eye strain and adds a floating glow that makes the screen pop. It’s a plug-and-play upgrade that takes about 30 minutes.
What to buy: Look for bias lighting kits with adhesive-backed LED strips, a USB power adapter (or plug into the TV’s USB port if it supplies enough current), and a remote or app control. Color temperature matters, 6500K daylight white is the standard for reducing eye strain, but RGB or tunable white strips let you change the mood.
Installation:
- Clean the back of the TV with isopropyl alcohol so the adhesive sticks.
- Run the strip around the perimeter, about 1 inch from the edge. Cut to length at the marked cut points (don’t cut anywhere else or you’ll kill the circuit).
- Plug in and test before securing permanently.
- Use cable clips or velcro ties to manage excess wire.
For a more dramatic effect, recess LED strips into shelving, behind crown molding, or inside panel grooves using aluminum channels with diffusers. Channels prevent hotspots and give a professional edge-lit look. Mount them with double-sided tape or small screws.
Dimming and control: Most LED strips come with IR or Bluetooth remotes. For whole-room integration, consider smart LED controllers compatible with Alexa, Google Home, or Apple HomeKit. Wiring multiple zones lets you highlight shelves, the TV, and accent walls independently.
Power considerations: Calculate total wattage before connecting multiple strips to one power supply. A typical 16-foot RGB strip draws 20–40 watts. Use a UL-listed power supply and avoid daisy-chaining cheap adapters.
Many modern designs featured on home decor sites showcase subtle backlighting that doesn’t overpower the space. Keep it functional, not flashy.
Natural Materials and Wood Paneling
Wood adds warmth and breaks up the tech-heavy feel of a TV wall. Options range from reclaimed barn wood to slatted panels and tongue-and-groove planks.
Reclaimed or dimensional lumber: Attach boards directly to studs or over a plywood backer using finish nails and construction adhesive. 1×6 or 1×8 pine, cedar, or hardwood works well. Stagger joints, keep spacing tight (or leave intentional gaps for a rustic look), and finish with polyurethane, Danish oil, or matte sealer to protect the surface.
Slatted wood panels (horizontal or vertical slats with gaps) are trending in 2026. You can buy prefab panels or DIY them using 1×2 furring strips spaced ½ to 2 inches apart on a backing board. Mount the whole assembly to studs with screws, then touch up screw heads with wood filler or decorative caps. This style works especially well with hidden LED lighting behind the slats.
Tongue-and-groove planks (like shiplap or nickel-gap) install similarly to siding. Start at the bottom or one side, use a level to ensure the first course is straight, and blind-nail through the tongue. Each row locks into the previous one. A miter saw or circular saw handles crosscuts: a table saw rips planks to width if needed.
Acclimation is critical: Let wood sit in the room for 48–72 hours before installation so it adjusts to humidity. Skipping this causes gaps or buckling later.
Finishing tips: Sand any rough edges (80-grit, then 120-grit), apply pre-stain conditioner on softwoods like pine to prevent blotching, stain if desired, and seal with 2–3 coats of your chosen finish. Wear a respirator when applying oil-based finishes in enclosed spaces.
Wood pairs beautifully with minimalist mounts or built-ins and brings an organic balance to the tech. It’s a moderate-skill project that delivers big visual impact.
Gallery Wall Arrangements Around Your TV
Treating the TV as part of a larger gallery wall integrates it into the decor instead of isolating it. This works best with symmetrical or grid layouts rather than organic salon-style arrangements.
Planning the layout: Use painter’s tape or kraft paper templates to mock up the arrangement on the wall. Keep the TV centered (or offset intentionally) and surround it with frames of similar depth so nothing sticks out farther than the screen. Matching frame profiles and mat colors create cohesion: too much variety competes with the TV.
Hanging hardware: For a level grid, use a laser level and consistent spacing (typically 2–3 inches between frames). Hang heavier frames on picture hangers rated for the weight or screws into studs. Lighter frames can use adhesive strips if you don’t want nail holes, but they won’t hold more than a few pounds.
What to display: Mix black-and-white photography, line art, prints, and small mirrors to add depth without clashing with on-screen content. Avoid busy patterns or overly colorful pieces that distract when the TV is on. Shelves interspersed with frames let you swap out small objects seasonally.
Sizing guidelines: Keep individual frames no larger than a quarter of the TV’s width, and leave a visual buffer zone (at least 4–6 inches) around the screen so the arrangement doesn’t crowd it.
Gallery walls soften the tech, make small TVs feel more intentional, and give you flexibility to update the look without major construction. This approach is popular in trending renovation and design content focused on personalized, lived-in spaces.
Conclusion
A modern TV wall is part carpentry, part design, and all about making intentional choices that fit your space and skill level. Whether you’re floating a screen with hidden cables, building a full entertainment center, or wrapping it in wood, the key is solid prep, accurate measurements, and finishes that hold up to daily use. Pick one approach, gather your materials, and start building.