A fire pit turns any backyard into a gathering spot, whether you’re roasting marshmallows with kids or hosting adults around the flames on a cool evening. The right design does more than add warmth: it anchors your outdoor living area and increases property value. From sleek steel bowls to stacked stone hearths, fire pit styles range from weekend DIY projects to custom built-ins that require a mason’s expertise. This guide covers 25+ design ideas across budgets and skill levels, plus the practical details, placement rules, fuel options, and material specs, that separate a safe, functional fire feature from a code violation.
Key Takeaways
- Fire pit design ideas range from budget-friendly DIY projects under $100 to luxury built-in features exceeding $10,000, so there’s an option for every backyard and skill level.
- Modern fire pit designs favor clean geometry and industrial materials like powder-coated steel, while rustic designs use natural stone and reclaimed brick to create authentic gathering spaces.
- Building codes typically require fire pits to be at least 10 feet from structures, 15 feet from combustible fences, and 25 feet from overhanging branches, so verify local regulations before construction.
- Propane offers convenient instant ignition with a 20-pound tank lasting 8–12 hours, while natural gas provides cheaper long-term costs but requires professional installation ($800–$2,500).
- Proper drainage, level bases, and non-combustible surfaces prevent long-term damage and safety issues, making prep work essential for any fire pit installation.
- Fire glass and lava rock are effective media for gas burners, with lava rock offering affordability ($15–$30 per bag) and a natural aesthetic compared to fire glass.
Modern Fire Pit Designs for Contemporary Backyards
Contemporary fire pits favor clean geometry and industrial materials. Rectangular steel bowls with powder-coated finishes in matte black or corten steel (the weathering type that develops a rust patina) fit minimalist patios. Expect to pay $400–$1,200 for a prefab model: custom-welded versions run higher.
Linear gas burners set into concrete slabs create a sleek, uninterrupted flame line. These typically use a stainless steel pan with lava rock or fire glass as the media. Installation requires running a natural gas line or burying a propane tank, both jobs best left to licensed pros familiar with local fuel-gas codes (NFPA 54/ANSI Z223.1).
For a DIY approach, pour a modern concrete fire bowl using QUIKRETE 5000 or similar high-strength mix in a two-part mold (available from specialty concrete suppliers). Embed a propane burner kit before the final cure. Sand smooth and seal with a high-temp concrete sealer rated to 500°F. Total materials run $150–$250, but plan a full weekend for forming, curing, and finishing.
Square or rectangular masonry pits built from concrete block and faced with thin veneer stone or large-format porcelain tile offer another modern option. Use 8×8×16-inch CMUs for the core structure, mortared with Type S mortar mix, and a cap stone cut to 12 inches wide for seating edges. This is a two-person job, blocks are heavy, and keeping courses level matters for both safety and aesthetics.
Rustic and Natural Fire Pit Ideas
Natural stone and reclaimed materials bring a campfire feel to suburban yards. A fieldstone ring laid dry (no mortar) works for casual, movable pits. Source rounded river rock or weathered granite from a landscape-supply yard: avoid sandstone or shale, which can crack or explode when heated. Stack stones in a 36- to 48-inch-diameter circle, two to three courses high, with gaps for airflow at the base.
For a semi-permanent design, dig a shallow bowl 6 inches deep, line the bottom with compacted gravel (¾-inch crushed stone works well), then build up a mortared stone wall using Type N mortar for better workability. Cap the top course with flat stones for a finished edge. Many homeowners using outdoor living design principles integrate fire pits into broader hardscape plans that include native plantings and gravel pathways.
Boulder fire pits use three to five large stones (200+ pounds each) arranged in a loose circle. You’ll need a skid-steer or tractor to move them: hand-setting isn’t realistic. Leave 8- to 12-inch gaps between boulders for seating access and airflow. This style suits properties with existing rock outcroppings or a naturalized landscape.
Reclaimed brick pits offer a rustic, cottage look. Old firebrick (the dense, tan type from industrial kilns) handles heat better than standard clay brick, which can spall. Lay brick in a running bond or herringbone pattern using refractory mortar for joints exposed to flame. Salvage yards and demolition sales are the best sources: expect to pay $0.50–$1.50 per brick depending on condition.
Budget-Friendly DIY Fire Pit Projects
A basic in-ground fire pit costs under $100 and takes an afternoon. Dig a bowl 18 inches deep and 36 inches across, slope the sides at roughly 45 degrees, and line the bottom with 4 inches of pea gravel for drainage. Ring the top edge with retaining-wall blocks (the 4×12-inch concrete type from big-box stores) set on leveled sand. No mortar needed, gravity and interlocking lips hold them in place. Wear leather gloves and use a 4-foot level to check each course.
Steel wheel-rim pits repurpose tractor or truck rims. A 30-inch-diameter rim from a farm-equipment auction or salvage yard runs $20–$50. Grind off any paint or coatings with a 4½-inch angle grinder and a flap disc: fumes from burning coatings are toxic. Set the rim on a gravel base and surround it with pavers or gravel for a clean surround.
For a sleeker look, use a galvanized fire ring insert ($40–$80 at home centers) and build your own surround from tumbled concrete pavers laid in a circle. Spread 1 inch of leveling sand, tamp it firm with a hand tamper, and set pavers tight against the ring. Fill gaps with polymeric sand and mist to activate the binder.
Cinder-block pits are the fastest build. Stack 8×8×16-inch blocks in a square or circle, two courses high, dry-laid (no mortar). Leave the cores (holes) facing up for airflow, or turn them sideways and fill cores with gravel for added mass. Estimated cost: $30–$60 for 24 blocks. Not the prettiest option, but functional for a rental or temporary setup.
Luxury Fire Pit Features and Built-In Designs
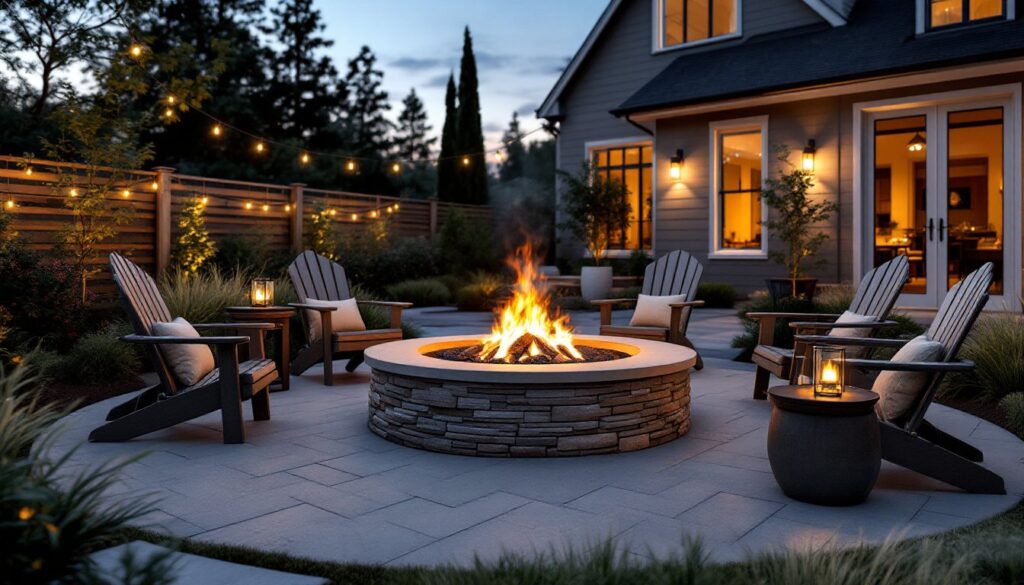
High-end fire pits integrate into full outdoor kitchens or become focal points in multi-zone patios. Built-in stone fire tables combine a gas burner with a granite or bluestone cap wide enough for drinks and appetizers. Expect to budget $3,000–$8,000 for a mason-built version using natural stone veneer over a CMU core, plus gas-line installation.
Sunken conversation pits with a central fire feature require excavation and retaining walls. Dig down 18–24 inches, pour a concrete footing (check frost-depth requirements in cold climates), and build block or poured-concrete seat walls faced with stone or stucco. Install a propane or natural-gas burner in the center, surrounded by decorative rock or fire glass. This is a permit-required project in most jurisdictions: hire a structural engineer if the pit exceeds 30 inches deep or if you have unstable soil.
Automated ignition and remote controls add convenience. Look for burner kits with electronic spark ignition and a flame-sensing thermocouple for safety shutoff. Wi-Fi-enabled controllers let homeowners adjust flame height from a phone app. Installation requires 12-volt wiring from a outdoor-rated transformer: follow NEC Article 680 for outdoor low-voltage circuits.
Many upscale designs seen in regional outdoor living magazines feature water-and-fire combinations, a raised bowl with a flame center and water spillways, or fire walls where a linear burner sits within a vertical stone or metal panel. These statement pieces often start at $10,000 and involve collaboration between a landscape architect, mason, and plumber.
Fire Pit Placement and Safety Considerations
Most building codes and fire ordinances require fire pits to sit at least 10 feet from structures, 15 feet from combustible fences or sheds, and 25 feet from overhanging tree branches. Verify local rules with your building department before digging or pouring: some municipalities ban open-flame fire pits entirely in high-fire-risk zones.
Surface and clearances: Place pits on non-combustible surfaces, concrete, pavers, gravel, or bare soil. Wooden decks are generally prohibited for wood-burning pits: gas models may be allowed if the deck is rated for the BTU output and a fireproof mat (rated to 1,400°F) is installed beneath. Check the deck’s framing, joists must be at least 2×8s on 16-inch centers to handle concentrated weight from masonry pits.
Keep a fire extinguisher (ABC-rated, minimum 5 pounds) or a garden hose within 20 feet. Have a metal lid or spark screen to snuff flames in windy conditions. Safety goggles and heat-resistant gloves are essential when adding logs or adjusting gas valves.
Smoke and wind: Position pits downwind of seating areas based on prevailing breezes, but know that wind shifts. Avoid low-lying areas where smoke pools. Neighbors and local air-quality regulations may restrict burn days: check before hosting a fire during wildfire season or on high-pollution alerts.
Permits: In many areas, permanent in-ground or built-in fire pits require a zoning or building permit, especially if you’re running a gas line. Inspectors verify setbacks, fuel-line connections, and structural footings. Portable, store-bought bowls typically don’t need permits, but use restrictions still apply.
Choosing the Right Materials and Fuel Type
Wood-burning pits deliver authentic crackling flames and aroma. Use seasoned hardwood, oak, maple, or hickory, with moisture content below 20% (check with a moisture meter if you’re serious). Wet or green wood smokes heavily and creates creosote buildup. A cast-iron fire grate elevates logs for better airflow. Store firewood at least 30 feet from the pit to prevent ember spread.
Propane offers convenience and instant ignition. A standard 20-pound tank (the grill-size cylinder) runs 8–12 hours on a medium flame, depending on BTU output (30,000–60,000 BTU is typical for patio pits). Bury the tank in a ventilated propane-tank vault for a cleaner look, or use a decorative tank cover. Always check hoses and fittings for leaks with soapy water before each use.
Natural gas requires a licensed plumber to tap your home’s gas line and run black iron or CSST (corrugated stainless steel tubing) to the pit location. Trench depth varies by code, usually 12–18 inches, and you’ll need a manual shutoff valve within 6 feet of the burner. Natural gas is cheaper per BTU than propane and never runs out mid-party, but installation costs $800–$2,500.
Materials for the pit body: Steel rusts unless it’s weathering steel (corten) or powder-coated: expect surface rust on untreated steel within a season. Stainless steel (304 or 316 grade) resists corrosion but costs 3–4× more. Firebrick or refractory concrete lines the inside of masonry pits to protect standard brick or block from thermal shock. Natural stone (granite, bluestone, flagstone) handles heat well and ages naturally: avoid limestone and marble, which can discolor or crack.
Fire glass and lava rock are popular media for gas burners. Fire glass (tempered glass chunks) comes in dozens of colors, doesn’t degrade, and reflects flame light. Lava rock is cheaper ($15–$30 per 10-pound bag vs. $50–$100 for fire glass) and provides a more natural look. Both hide the burner and distribute heat evenly. Incorporating these details alongside ideas from regional design traditions can help tailor your fire pit to local aesthetics and climate.
Conclusion
A well-designed fire pit extends outdoor living season and creates a natural gathering point. Whether it’s a simple stone circle or a built-in gas feature with custom stonework, the key is matching the design to the site, budget, and skill level. Prioritize safety clearances, check local codes early, and don’t skip prep work, level bases and proper drainage prevent most long-term headaches. Pick materials that suit the climate and fuel type that fits how often the pit will actually get used.