Cabinets account for roughly 30–40% of a kitchen remodel budget, so getting them right matters. They dictate workflow, set the visual tone, and determine how much functional storage the space actually delivers. Whether tackling a full gut renovation or swapping outdated boxes for factory-direct units, homeowners face dozens of decisions: framed or frameless construction, plywood or MDF cores, slab doors or raised-panel profiles. This guide cuts through the marketing jargon and walks through cabinet types, materials, layout strategies, current color trends, and the real cost trade-offs between DIY assembly and professional installation.
Key Takeaways
- Kitchen design cabinets account for 30–40% of a remodel budget and require thoughtful planning around construction type, materials, and layout to maximize function and durability.
- Framed cabinets are sturdy and forgiving for uneven walls, while frameless cabinets offer a modern look with more interior space but demand precise box construction.
- Plywood remains the best material for cabinet longevity, especially near sinks and dishwashers, though plywood-box-with-MDF-door combinations offer cost-effective durability.
- Two-tone color schemes with dark lower cabinets and light uppers, warm neutrals, and natural wood stains define 2026 kitchen design trends over outdated all-white palettes.
- DIY assembly combined with professional installation provides the best balance of savings and quality, while proper measurements and plumb-and-level shimming prevent costly mistakes.
- Stock cabinets range from $75–$200 per linear foot, but investing in quality construction, thoughtful layout, and realistic budgeting prevents mid-project compromises and do-overs.
Understanding Cabinet Types and Styles for Your Kitchen
Kitchen cabinets fall into three main construction categories: framed (face-frame), frameless (European-style), and inset. Each affects both aesthetics and how doors align.
Framed cabinets feature a 1½” face frame across the box opening. Doors mount to that frame with exposed or semi-concealed hinges. This is the default in most North American production cabinets, sturdy, traditional, and forgiving if walls aren’t perfectly plumb. The frame does eat into interior width, typically reducing access by an inch per side.
Frameless cabinets eliminate the face frame entirely. Doors mount directly to the cabinet sides with fully concealed European hinges, offering a clean, modern look and slightly more interior space. Box construction must be precise: any racking shows immediately. You’ll find frameless construction in IKEA SEKTION lines and many semi-custom euro-style brands.
Inset cabinets sit flush inside a face frame, requiring tight tolerances and premium hardware. They’re the hallmark of custom cabinetry and command a price premium, expect 15–30% more than overlay framed construction for the same layout.
Door styles range from slab (flat panel, modern or Shaker-adjacent) to raised-panel (traditional), beadboard, and glass-front. Slab doors cost less to produce and suit contemporary or transitional kitchens. Raised-panel or recessed-panel (Shaker) profiles add dimension and work well in farmhouse, craftsman, or classic designs. Glass-front uppers break up solid runs and let you display dishware, but they demand tidy interiors.
How to Choose the Right Cabinet Material and Finish
Cabinet longevity hinges on box material and door substrate. Budget and moisture exposure drive most decisions.
Popular Cabinet Materials
Plywood remains the gold standard for cabinet boxes. ½” or ⅝” hardwood plywood (birch or maple veneer) resists warping, holds screws well, and tolerates occasional moisture better than particleboard. Full-plywood construction adds 20–40% to cabinet cost but pays off in durability, especially for base cabinets near sinks or dishwashers.
MDF (medium-density fiberboard) machines cleanly and takes paint beautifully, making it ideal for painted slab or five-piece doors. It’s heavier than plywood, dents more easily, and swells if water sits on it. Many semi-custom lines use plywood boxes with MDF doors, a sensible compromise.
Particleboard appears in budget and ready-to-assemble (RTA) cabinets. Melamine-coated particleboard works for box interiors if kept dry, but avoid it for structural parts or anywhere plumbing might leak. IKEA’s SEKTION boxes use melamine-faced particleboard with reinforced corners: they hold up fine if assembled correctly and not flooded.
Solid wood doors (maple, oak, cherry, hickory) show natural grain and can be stained or clear-coated. Wood moves with humidity, so expect minor seasonal gaps in door alignment. For interior design trends leaning toward organic textures, solid wood delivers warmth that laminates can’t match.
Thermofoil wraps MDF cores in a heat-fused vinyl film. It’s budget-friendly, wipes clean, and resists minor moisture, but the film can peel near heat sources (beside ranges or dishwashers) and doesn’t allow on-site touch-ups. Colors are limited to what manufacturers stock.
Finish choices include factory-catalyzed lacquer, conversion varnish, or UV-cured coatings. Factory finishes cure harder and more uniformly than field-applied paint. If painting existing cabinets, use a bonding primer (BIN shellac-base or STIX waterborne) and a durable topcoat like Benjamin Moore Advance or Sherwin-Williams ProClassic.
Planning Your Kitchen Cabinet Layout for Maximum Functionality
Good cabinet layout respects the work triangle, the path between sink, range, and refrigerator, and allocates storage where it’s actually used. Measure twice: stock cabinets come in 3″ increments (12″, 15″, 18″, etc.), and filler strips eat up costly space if the layout doesn’t add up.
Base cabinets are typically 24″ deep and 34½” tall (plus countertop). Standard widths run 9″ to 48″. Drawer-base units near the range hold pots and utensils: door-base cabinets work under the sink (leave room for plumbing) or for bulk storage. Lazy Susans fit corner bases and recover dead space, though they waste the outer 6–8″ radius.
Wall cabinets measure 12″ or 15″ deep (12″ is standard over counters) and 30″, 36″, or 42″ tall. Taller uppers, especially 42″ or 45″ cabinets that run to the ceiling, maximize storage and avoid dust-collecting soffits. Leave at least 15–18″ clearance above the countertop: 18″ is more comfortable for small appliances. Over ranges, check the hood manufacturer’s minimum clearance (usually 24–30″ for gas, 18–24″ for electric).
Pantry and tall cabinets (84″ or 90″ high, 12–24″ deep) consolidate dry goods and small appliances. A 24″-wide pantry with pull-out shelves beats a walk-in closet for accessibility in most galley or L-shaped kitchens.
Filler strips (3″ or 6″ wide) ensure doors and drawers clear walls, appliances, or each other. Plan them into the layout rather than discovering gaps during installation. If the run ends at a wall, a 1″ or 1½” scribe filler lets you trim the cabinet flush even if the wall isn’t plumb.
Sketch the layout on graph paper (¼” = 1′) or use free software like SketchUp or the IKEA kitchen planner. Note appliance rough-in dimensions, electrical outlets (required every 48″ along counters per NEC), and whether the dishwasher door swings left or right.
Cabinet Color Trends and Design Ideas for 2026
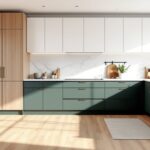
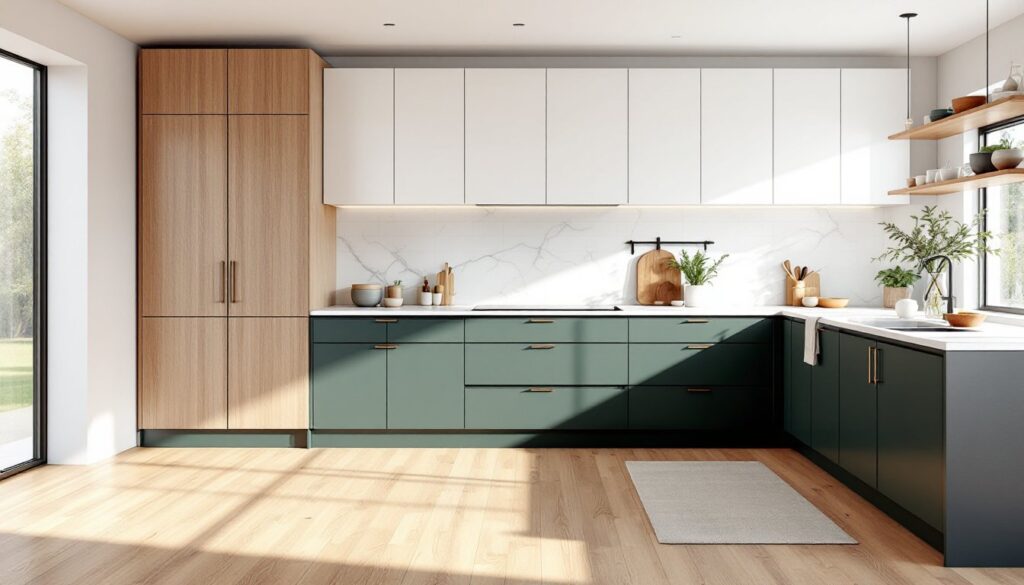
All-white kitchens peaked around 2018: current trends favor layered color palettes and mixed finishes. Expect to see more contrast between upper and lower cabinets, accent islands, and wood tones paired with painted boxes.
Two-tone schemes, navy or forest-green lowers with white or light-gray uppers, add depth without overwhelming small spaces. Dark lower cabinets ground the room and hide scuffs near the floor: light uppers keep sight lines open. Painting only the island in a bold hue (charcoal, deep blue, or even black) creates a focal point and costs less than a full two-tone job.
Warm neutrals are displacing cool grays. Greige, latte, taupe, and creamy off-whites soften kitchens and pair well with brass or matte-black hardware. Sherwin-Williams Accessible Beige and Benjamin Moore Pale Oak show up frequently in kitchen design ideas for 2026.
Natural wood stains, especially white oak with a clear or cerused finish, balance the painted-cabinet trend. Quarter-sawn or rift-sawn oak offers straight, consistent grain that suits both modern and craftsman styles. Walnut and lighter hickory also appear in higher-end projects, though both cost significantly more than maple or birch.
Slab-front cabinets in matte finishes dominate contemporary kitchens, but Shaker profiles remain the most versatile choice. A painted Shaker door works in transitional, farmhouse, or even minimalist settings depending on hardware and countertop pairings. For inspiration across minimalist to vintage styles, many designers browse curated collections on cabinet showcase sites.
Hardware shifts away from polished chrome and brushed nickel toward matte black, unlacquered brass, and aged bronze. Oversized pulls (6″ or 8″ center-to-center) suit wide drawers, while knobs still work on doors. Mixing knobs and pulls is acceptable, use pulls on drawers and working doors, knobs on less-accessed uppers.
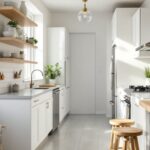
Open shelving continues to appear as an accent, not a full replacement. Floating shelves or a single run of open upper storage breaks up solid cabinetry and displays everyday dishes, but it demands discipline, clutter shows instantly.
Budget-Friendly Cabinet Solutions: DIY vs. Professional Installation
Cabinet costs vary wildly. Stock cabinets from big-box stores run $75–$200 per linear foot installed: semi-custom (cabinet dealers, mid-range brands) land around $200–$500 per linear foot: full custom starts at $500 and climbs past $1,200 depending on species, finish complexity, and hardware.
Ready-to-assemble (RTA) cabinets offer the steepest savings. IKEA SEKTION boxes cost roughly $50–$150 per cabinet unassembled, not including doors, drawer fronts, or hardware. Quality control varies, inspect panels for damage before starting assembly. Cabinet wholesalers and online RTA suppliers (CabinetJoint, RTA Cabinet Store) stock frameless and framed options in more finishes than IKEA but require careful measurement and ordering.
DIY installation is feasible for competent DIYers with a laser level, drill, stud finder, and a helper. Wall cabinets go up first, screwed into studs with 2½” or 3″ cabinet screws (minimum two screws per stud). Shim cabinets plumb and level, don’t force boxes to match wavy walls. Base cabinets follow, shimmed level across the floor and screwed together through face frames or cabinet sides. Leave ⅛”–¼” gaps between cabinet backs and walls to accommodate outlets and uneven surfaces.
Wear safety glasses when drilling overhead and work gloves when handling raw cabinet edges. Enlist help for wall cabinets over 30″ wide: dropping a loaded box breaks toes and cabinets. A cabinet lift or simple 2×4 ledger screwed temporarily to the wall makes solo hanging safer.
Professional installation typically costs $50–$150 per cabinet or 15–30% of cabinet purchase price. Pros work faster, carry insurance, know how to scribe around out-of-plumb walls, and install crown molding, under-cabinet lighting, and toe-kick vents. If the kitchen requires moving plumbing, running new electrical circuits, or structural changes (removing walls, sistering joists), hire licensed tradespeople. Most jurisdictions require permits for electrical and plumbing work: cabinet installation itself rarely does unless part of a larger remodel.
Many users browsing photo galleries of kitchen cabinets notice that professional detailing, perfect reveals, tight miters on crown, scribing to uneven ceilings, elevates the finished look. If budget allows, consider DIY assembly and layout with pro installation for the final fit and trim.
Conclusion
Cabinets anchor a kitchen’s function and style, so invest time in planning materials, layout, and finishes before ordering. Plywood boxes outlast particleboard, thoughtful layouts beat generic templates, and realistic budgeting prevents mid-project compromises. Whether assembling RTA units or commissioning custom joinery, clear measurements, honest assessment of skill level, and attention to prep work separate successful projects from expensive do-overs.