Transforming a bedroom into a Minecraft-themed space isn’t just about slapping pixelated wall decals on drywall and calling it done. It’s about creating an immersive environment that captures the blocky, creative spirit of the game while maintaining functionality and livability. Whether tackling this project for a child’s room or a dedicated gaming space, the key is balancing theme authenticity with practical design choices that won’t feel dated in two years. This guide walks through the planning, materials, and execution needed to build a Minecraft bedroom that actually works, from wall treatments and furniture hacks to lighting solutions and budget-conscious DIY projects.
Key Takeaways
- A Minecraft bedroom design leverages the game’s modular, blocky aesthetic to create an immersive space that doesn’t require licensed merchandise when built with thoughtful DIY projects and paint treatments.
- Start with the bed as the anchor piece—a simple platform with a cube-frame headboard using plywood squares painted in grass green and brown to capture the iconic Minecraft block look.
- Achieve the signature grass-block wall treatment using painter’s tape and two-color latex paint with a horizontal divide at 32–36 inches from the floor, requiring approximately 1.5 gallons for a standard 12×12 bedroom.
- DIY floating block shelves, sword wall art, and Creeper storage bins add functional decor that reinforces the theme without expensive licensed purchases.
- Prioritize budget-friendly paint projects and secondhand furniture (especially modular cube units) over expensive themed merchandise to maximize visual impact while controlling costs.
- Use phased implementation—starting with wall treatments, then lighting, then furniture—to spread expenses and allow adjustments before committing to permanent changes.
Why Choose a Minecraft Theme for Your Bedroom?
Minecraft’s aesthetic translates surprisingly well to interior spaces because of its modular, geometric foundation. The game’s 16×16 pixel block structure creates clean visual repetition that’s easier to execute than intricate character murals or detailed graphics. Parents appreciate that the theme doesn’t require licensed merchandise to feel authentic, DIY solutions using basic materials can capture the look effectively.
The color palette is inherently flexible. Grass greens, stone grays, wood browns, and sky blues are neutral enough to grow with a child’s changing tastes, unlike more fleeting pop culture themes. These earth tones also pair well with standard home furnishings, meaning you won’t need to replace every stick of furniture to make the room cohesive.
From a project standpoint, Minecraft designs reward basic carpentry and painting skills. Building simple cube-shaped storage, painting pixelated patterns on accent walls, or constructing blocky headboards are all approachable weekend projects that don’t require advanced joinery or specialty tools. The forgiving, low-resolution aesthetic means small imperfections actually enhance the theme rather than detract from it.
Essential Elements of Minecraft Bedroom Design
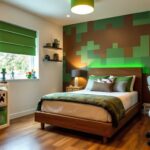
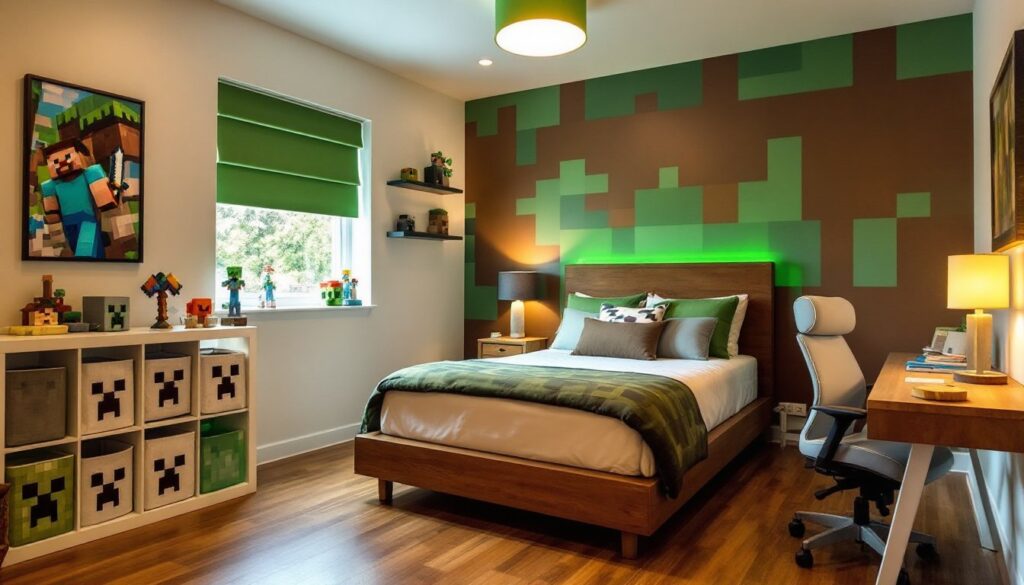
Start with the bed as the room’s anchor piece. A platform bed with a simple cube-frame design mimics Minecraft’s blocky forms better than ornate traditional styles. If building a custom headboard, use ¾-inch plywood or MDF cut into squares and arranged in a grid pattern, painted in grass-block green with brown “dirt” squares beneath. Secure panels to wall studs using 2½-inch wood screws and construction adhesive for stability.
Flooring considerations matter more than they might seem. If replacing flooring is in scope, luxury vinyl plank (LVP) in oak or birch tones echoes the game’s wood textures while offering durability and easy maintenance. Existing carpet can be covered with area rugs featuring geometric patterns, look for low-pile commercial-grade options that handle foot traffic and won’t show wear patterns quickly.
Window treatments should block light effectively for screen time while reinforcing the theme. Custom fabric shades using Minecraft-printed cotton (available from fabric retailers) work, but blackout roller shades in solid green, brown, or blue with DIY pixel-art appliqués using heat transfer vinyl (HTV) offer better light control. Apply HTV using a standard household iron set to cotton setting (no steam), pressing for 15–20 seconds per section.
Color Palette and Wall Treatments
The signature Minecraft grass block, green top, brown sides, with a visible dirt boundary, is the most recognizable wall treatment option. Achieve this with painter’s tape and standard interior latex paint in satin or eggshell finish. Start with a base coat in the lighter color (usually green), let it cure for 24 hours, then tape off the horizontal divide at roughly 32–36 inches from the floor (adjust based on ceiling height and visual balance).
Paint coverage runs about 350–400 square feet per gallon for quality brands like Sherwin-Williams or Benjamin Moore. For a 12×12 bedroom with 8-foot ceilings, expect to use approximately 1.5 gallons total across both colors, factoring in two coats. Sand lightly with 220-grit sandpaper between coats for the smoothest finish.
Pixelated accent walls require more planning. Use a level and chalk line to establish a grid, 12×12-inch squares create bold visual impact without requiring excessive taping. Smaller grids (6×6 or 8×8) work for feature areas but increase labor significantly. Many DIY home projects rely on precise measuring and layout work like this, so don’t rush the grid establishment phase.
Alternatively, removable wallpaper with Minecraft textures offers a no-commitment option for renters or those hesitant about permanent changes. Application requires clean, smooth walls, patch any holes with spackle and sand flush before installing. Work from top to bottom, using a smoothing tool to eliminate air bubbles as you go.
DIY Minecraft Decor Projects You Can Build at Home
Floating Block Shelves: These iconic game elements translate into functional storage. Cut ¾-inch birch plywood into five squares (dimension depends on desired size, 12×12 inches works well for most applications). Assemble into an open-faced cube using wood glue and 1¼-inch finish nails. For mounting, install a French cleat system rated for the expected load, books and collectibles can add up quickly. Cleats distribute weight across wall studs better than single-point brackets.
Sword and Pickaxe Wall Art: Scale up game tool designs using ½-inch MDF for lightweight hanging pieces. Print templates at desired size, transfer to material using carbon paper, then cut with a jigsaw. Sand all edges smooth with 120-grit sandpaper, prime with spray primer, and finish with acrylic craft paint in metallic silver (for tools) or bright colors (for handles). Seal with clear polyurethane spray for durability. Hang using sawtooth picture hangers on the back.
Creeper Face Storage Bins: Transform basic cube storage bins (available at Target, IKEA, or Home Depot) with adhesive vinyl or paint. The Creeper’s pixelated face requires only black squares on a green background, eight black squares arranged in a specific pattern. For painted versions, use painter’s tape to mask off squares, apply acrylic craft paint in two coats, and seal with matte ModPodge to prevent chipping.
Redstone Torch Nightlights: Build these using PVC pipe (1-inch diameter works for handheld versions, 2-inch for floor-standing), red LED strip lights, and basic wiring. Cut pipe to desired length with a PVC cutter or hacksaw, sand cut edges smooth, and insert LED strips (battery-powered versions simplify wiring). Cap the top with a PVC end cap, painting the assembly in gray and brown tones to mimic stone and wood textures. This project involves basic electrical work, if wiring hardwired versions, follow NEC (National Electrical Code) standards and consult a licensed electrician if unfamiliar with residential wiring.
Furniture and Storage Solutions for a Blocky Aesthetic
Cube-shaped furniture reinforces the Minecraft aesthetic while maximizing storage. IKEA’s Kallax series is purpose-built for this, the modular squares stack horizontally or vertically, and bins fit perfectly in the cubbies. Paint the unit in custom colors if the standard finishes don’t match your palette: use furniture primer designed for laminate surfaces, followed by cabinet-grade paint in satin finish for durability.
For custom builds, construct simple cube storage from ¾-inch plywood. A basic 16-inch cube requires six panels cut to size, joined with pocket screws (Kreg Jig makes this straightforward) or butt joints reinforced with glue and finish nails. Pocket holes should be drilled at 15-degree angles using a jig, with 1¼-inch coarse-thread screws for plywood assembly. Sand all surfaces with 150-grit sandpaper before finishing.
Desk solutions need to balance theme and function. A simple butcher block countertop (available in standard lengths from home centers) mounted on cube storage units creates a clean, blocky workstation. Support longer spans (over 48 inches) with an additional leg or bracket at center to prevent sagging, ¾-inch butcher block can support typical desk loads at 48-inch spans, but 60+ inches require intermediate support.
Consider furniture scale carefully in smaller rooms. Oversized cube storage can overwhelm limited floor space. In rooms under 100 square feet, stick to wall-mounted solutions and smaller-scale cube units (12-inch depth rather than 16-inch) to maintain usable floor area. Measure existing furniture and tape out proposed pieces on the floor before building or buying.
Lighting Ideas to Bring Your Minecraft World to Life
Glowstone-inspired ceiling fixtures create ambient lighting that references in-game light sources. Build these using acrylic diffuser panels (available at lighting supply stores or online) cut into squares, backed with LED strip lighting in warm white (3000K color temperature mimics the game’s glowstone hue). Frame panels with simple 1×2 pine trim, mitered at corners, painted in pale yellow or cream.
For installation, mount to ceiling joists using toggle bolts if attaching to drywall between joists, or 2-inch wood screws directly into joists where possible. Ensure all electrical connections follow local code, most jurisdictions require hard-wired ceiling fixtures to be installed by licensed electricians or inspected if homeowner-installed. Battery-powered LED versions sidestep this requirement but require regular battery replacement.
Lantern-style table lamps echo the game’s portable light sources. Contemporary furniture guides often feature industrial cage fixtures that work well with minor modifications, wrap the cage in thin metal sheet painted black to create the lantern frame effect, and use Edison-style LED bulbs (40-watt equivalent) for the right amber glow without excessive heat.
Task lighting at desks or reading areas should prioritize function. Clip-on LED desk lamps with adjustable arms provide necessary lumens (aim for 400–500 lumens for reading and screen work) without competing visually with theme elements. Position desk lamps to minimize screen glare, typically to the side rather than directly behind the monitor.
RGB LED strip lighting behind furniture or under shelving adds customizable color without permanent installation. Quality strips include adhesive backing and remote control for color selection. Install along the back edge of desks, headboards, or cube shelving for a subtle glow. Power via USB adapters rather than direct wiring for easy removal or repositioning.
Budget-Friendly Tips for Creating a Minecraft Bedroom
Prioritize paint over purchases. A gallon of quality latex paint runs $35–50, while a single piece of themed furniture can cost $200+. Focus budget on materials for DIY projects rather than licensed merchandise. The blocky aesthetic rewards effort more than expensive materials, a well-executed painted accent wall makes more visual impact than a store-bought comforter set.
Source free or cheap materials creatively. Cardboard boxes, spray-painted and stacked, create temporary decorative blocks for younger kids. Moving boxes (available free from grocery stores or liquor stores) can be cut, folded, and painted to create life-sized Minecraft blocks, villagers, or mobs at essentially zero cost beyond paint and time.
Phase the project rather than attempting everything simultaneously. Start with wall treatments (biggest visual impact), then move to lighting, then furniture modifications. This spreads costs across several months and allows for course corrections if initial elements don’t work as planned. Many room design concepts recommend this phased approach for maintaining budget control.
Shop secondhand for base furniture. The cube storage units, basic dressers, and simple bed frames that work best for this theme are commonly available at thrift stores, estate sales, and online marketplaces for a fraction of retail cost. A basic cube shelf unit that costs $80 new often appears at Goodwill for $15–20. Invest savings in quality paint and hardware for refinishing.
Use digital tools for planning. Free room layout apps (like Roomstyler or Planner 5D) let you visualize furniture arrangements before moving heavy pieces or committing to layouts. This prevents costly mistakes like ordering furniture that doesn’t fit or blocking necessary clearances. Standard bedroom doors require 32-inch clearance minimum: furniture layouts should maintain this and provide adequate space for drawers and doors to open fully.