An accessible bathroom isn’t just for aging in place or accommodating wheelchair users, it’s a smart design approach that makes daily routines safer and easier for everyone. Whether you’re dealing with a temporary injury, planning for future mobility changes, or simply want a more functional space, accessible design principles deliver comfort without sacrificing style. This guide walks through the layout decisions, fixture choices, and finish details that turn a standard bathroom into a space that works for all abilities and life stages.
Key Takeaways
- Accessible bathroom design works for everyone across all abilities and life stages, combining safety with style by eliminating hazards like hard surfaces, wet floors, and tight quarters where most home accidents occur.
- A 60-inch diameter turning circle, 32-inch doorways, and adequate fixture clearances—especially for sinks and toilets—are essential layout fundamentals that ensure the space truly remains functional for wheelchair users and those with mobility challenges.
- Comfort-height toilets (17–19 inches), grab bars anchored into solid blocking, curbless showers with proper slope, and handheld showerheads on slide bars transform bathing areas into safe zones where transfers and seated showering are intuitive.
- Single-lever faucets, wall-hung sinks with knee clearance, and lever-style door handles eliminate the grip strength and fine-motor demands that make standard fixtures difficult for arthritic hands and people with limited dexterity.
- Slip-resistant flooring with a DCOF of 0.42 or higher, layered lighting with sconces at 60–66 inches, and rocker-style switches mounted at 48 inches maximum create an environment where accessible features feel intentional rather than medicalized.
- Accessible bathrooms increasingly add measurable home value as aging populations seek properties that won’t require expensive modifications, making universal design both a safety investment and a smart financial choice.
Why Accessible Bathroom Design Matters for Every Home
Accessible bathroom design addresses a simple reality: bodies change. Injuries happen. Parents carry toddlers while balancing shampoo bottles. Aging happens to everyone, and the bathroom, with its hard surfaces, wet floors, and tight quarters, is where most home accidents occur.
Universal design principles make spaces usable for the widest range of people without special adaptation. In a bathroom, that means eliminating barriers before they become problems. A curbless shower serves a wheelchair user today and prevents a fall for someone recovering from knee surgery tomorrow. Lever faucets work for arthritic hands and kids’ soapy fingers alike.
Beyond safety, accessible features often boost home value. As the population ages, buyers increasingly prioritize homes that won’t require expensive modifications down the road. The design choices covered here meet ADA guidelines where applicable, though residential projects aren’t legally required to comply unless receiving certain federal funding. Still, those standards offer solid benchmarks for clearances and fixture heights.
This isn’t about institutional-looking grab bars and clinical white tile. Modern accessible bathrooms blend safety features into cohesive designs that feel intentional, not medicalized.
Essential Layout and Space Planning Considerations
Space planning determines whether accessibility features actually work. The International Residential Code (IRC) sets minimum bathroom dimensions, but accessible design requires more generous clearances.
Aim for a 60-inch diameter turning circle if accommodating a wheelchair, that’s the space needed for a full rotation. In tight quarters, a T-shaped clearance (60 inches along one leg, 36 inches along the perpendicular) can substitute, though it’s less convenient. Doorways should measure 32 inches clear width minimum (a 34-inch or 36-inch door, measured from stop to stop when open 90 degrees). Pocket doors or outswing doors prevent the door itself from eating up precious floor space.
Place fixtures to preserve clear floor space. The toilet needs 18 inches of clearance from its centerline to any wall or fixture, with at least 56 inches of depth from the back wall for forward transfer from a wheelchair. Sinks benefit from knee clearance underneath, 27 inches high, 30 inches wide, and 19 inches deep, allowing someone seated to roll close.
Avoid the temptation to cram in extra features. A bathroom with generous clearances beats one with a jetted tub nobody can safely access. If you’re doing a gut renovation, consult local building codes early, some jurisdictions require permits for layout changes, especially if you’re moving plumbing or electrical.
Choosing the Right Fixtures for Accessibility
Fixture selection balances function, safety, and aesthetics. The right choices make daily tasks intuitive rather than obstacles.
Toilets and Support Bars
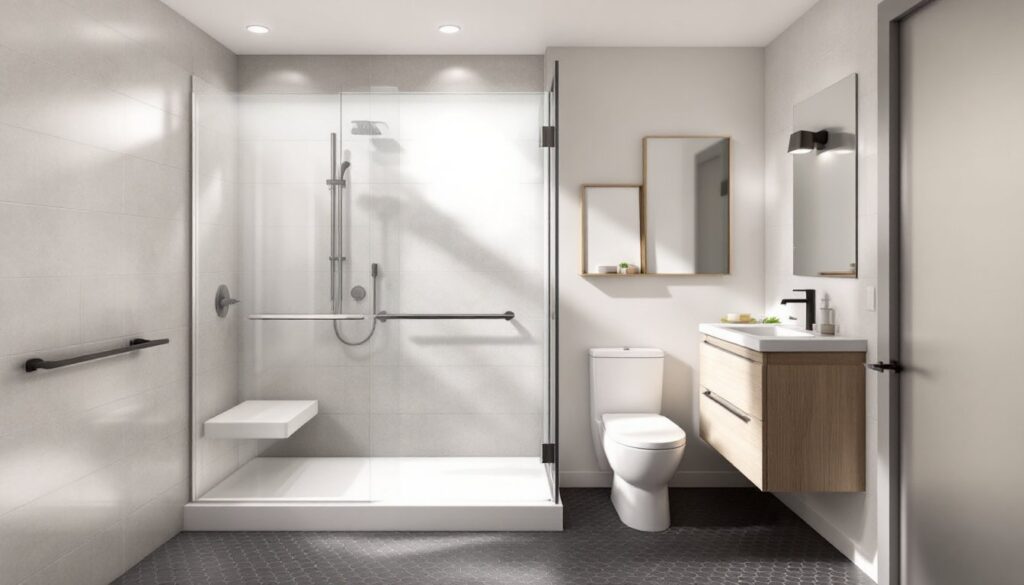
Comfort-height toilets (17–19 inches from floor to seat) ease transfers for most users compared to standard 15-inch models. They’re marketed as ADA-compliant or universal height. Wall-hung toilets offer adjustable mounting height during installation and simplify floor cleaning, though they require blocking between studs, 2×10 or 2×12 backing rated for at least 300 pounds, installed during framing or exposed in a renovation.
Grab bars aren’t optional. Install 1.25- to 1.5-inch diameter bars on at least one side of the toilet, mounted 33–36 inches above the floor. Side bars should extend at least 54 inches from the back wall: rear bars span at least 36 inches wide, positioned 6 inches from the toilet centerline. Both must anchor into solid blocking, not just drywall. Stainless steel or powder-coated bars come in finishes matching other hardware, matte black, brushed nickel, oil-rubbed bronze, so they integrate visually rather than screaming “medical equipment.”
Skip decorative towel bars near the toilet. People instinctively grab whatever’s close when losing balance, and towel bars aren’t engineered for body weight.
Sinks and Vanity Solutions
Wall-hung sinks or vanities with open space underneath provide wheelchair access. The sink rim should sit 34 inches high maximum, with that knee clearance mentioned earlier. Insulate or cover drain pipes to prevent leg burns from hot water lines.
Single-lever or touchless faucets eliminate the grip strength needed for separate hot/cold knobs. If you prefer a traditional look, cross-handle or lever-style faucets work better than round knobs. Install faucets no more than 20 inches from the front edge of the counter to avoid overreaching.
Consider a shallow basin, many vessel sinks or farmhouse-style models sit too high when mounted on a standard-height vanity. Instead, opt for an undermount sink in a 5- to 6-inch depth that preserves clearance without sacrificing functionality.
Creating a Safe and Functional Shower or Bathing Area
Showers present the highest injury risk in bathrooms, so this is where accessibility investments pay off most.
Curbless or low-threshold showers eliminate the trip hazard of a traditional curb. A curbless shower requires careful floor sloping, 1/4 inch per foot toward the drain, to prevent water escape, and often needs a linear drain rather than a center point drain for better water management. This usually means lowering the shower floor joists during framing or building up the surrounding bathroom floor. If a full curbless design isn’t feasible, a 1/2-inch beveled threshold offers a compromise.
Dimensions matter. A 60-inch by 30-inch shower accommodates a transfer bench: a true roll-in shower for wheelchairs needs at least 60 inches by 60 inches with no curb. Install a fold-down shower seat or built-in bench at 17–19 inches high and at least 15 inches deep. Wall-mounted seats save floor space and allow positioning where it’s most useful, but they need blocking behind the tile, 2×6 or 2×8 blocking anchored to studs.
Grab bars are non-negotiable. Place one horizontal bar 33–36 inches high on the control wall, another on the back or side wall. Vertical bars near the entry help with balance when stepping in. All shower bars must anchor into blocking, never just the tile backer.
Controls should mount 38–48 inches above the floor, positioned on a side wall rather than under the showerhead so they’re reachable without entering the water stream. A handheld showerhead with a 60-inch hose on a slide bar offers flexibility for seated showering or varied heights. Thermostatic or pressure-balanced valves prevent scalding if someone flushes a toilet mid-shower, most codes require these now anyway.
If you’re keeping a tub, consider a walk-in model with a door or a transfer deck. Standard tubs need grab bars at 33–36 inches high on the control wall and back wall. A tub-shower combo should include both a fixed showerhead and a handheld option.
Flooring, Lighting, and Finishing Touches for Safety
The details, flooring, lighting, hardware, determine whether a well-planned layout actually feels safe and comfortable in daily use.
Slip-resistant flooring is essential. Look for a dynamic coefficient of friction (DCOF) of 0.42 or higher when wet. Textured porcelain or ceramic tile, non-slip vinyl, and certain natural stones work well. Avoid polished marble, glazed ceramic without texture, and large-format tiles with minimal grout lines (grout adds traction). Smaller tiles like 2-inch hex or 3-inch subway create more grout joints. For a current take on accessible materials, Remodelista features slip-resistant options that don’t sacrifice style.
Matte finishes outperform gloss in wet areas. If you love a specific glossy tile, save it for a backsplash or dry wall, not the shower floor.
Lighting deserves as much thought as plumbing. Layered lighting, overhead, task, and night lighting, prevents shadows and harsh glare. Install sconces at 60–66 inches on both sides of the mirror rather than a single overhead fixture that casts shadows on faces. LED strips under a floating vanity or along the toe-kick provide nighttime wayfinding without blinding someone at 3 a.m. Dimmers let users adjust light levels for comfort.
All switches and outlets should mount at 48 inches maximum (ADA recommends 15–48 inches for accessibility). Rocker-style switches beat toggles for anyone with limited dexterity. Ground-fault circuit interrupter (GFCI) protection is code-required within six feet of water sources.
Hardware and accessories round out the space. Lever door handles replace round knobs. Toilet paper holders, towel bars, and shelving should mount 15–48 inches high and within easy reach of their related fixture, no stretching required. Open shelving or pull-out drawers beat deep cabinets where items get lost in back corners. For more ideas on integrating accessible features into polished designs, HGTV showcases real-world projects balancing function and aesthetics.
Safety note: Wear appropriate PPE during any bathroom renovation. Demolition requires safety glasses, dust masks (N95 minimum), and gloves. Tile work demands knee pads and hearing protection if using a wet saw. If you’re dealing with a pre-1980s home, test for asbestos in old flooring and lead paint before disturbing surfaces, this work often requires licensed abatement pros.
Accessible bathroom design isn’t a one-size-fits-all checklist. It’s about understanding principles, clearances, fixture heights, slip resistance, and applying them to a specific household’s needs. The homeowner recovering from hip surgery has different priorities than parents bathing young kids, but both benefit from eliminating unnecessary obstacles. Done right, accessibility features disappear into a cohesive design that simply works better for everyone who uses the space.